Design

Table of Contents
The Pea Hut - This article is part of a series.
Scope #
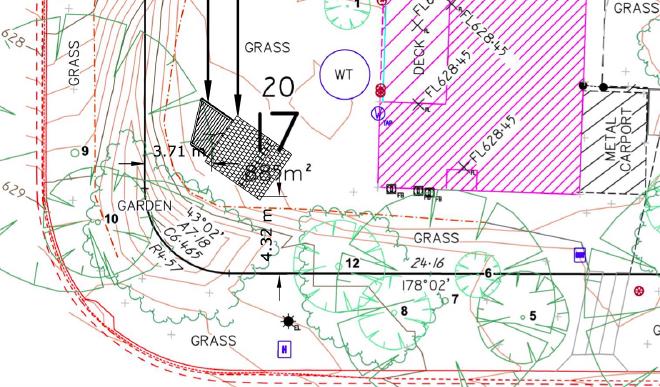
To keep things affordable and low-key, I decided on a single room of 3x3 metres. If I also kept the height above natural ground level within 3m, I would not need building approval. After a great deal of uncertainty, I eventually talked to a government officer and discovered that I would not need development approval either, as long as it was built within certain setbacks from the block boundaries. (Unfortunately this was after I had paid $645 to lodge a development application and $1595 for a surveyor.)
Having no toilet obviously limits the usefulness of the room - you could not live there. But all the options were problematic. Plumbing would be expensive and disruptive. Composting toilets require excavation and maintenance. Incinerating toilets require lots of ventilation that is inconsistent with my thermal integrity goals.
My wife and I agreed on a budget of around $30k.
I looked at several prefabricated, kit, or builder packages for garden studios. However, most would have poor thermal integrity or require a great deal of alteration work to get reasonable thermal performance and appropriately placed windows. The builder packages I looked at were expensive - around $100k.
So, with no prior experience, I set about learning how to do it myself.
Philosophy #
My research and work led me to these guiding principles:

- High performance windows
- Windows are holes in the building fabric. They are hotspots of heat transfer. Investing in windows pays off disproportionately to their area.
- Continuous insulation
- Heat flows through the paths of least resistance. It is better to have complete coverage of thin insulation, than patchy coverage of thick insulation. So it makes sense to cover over the structural frame of the house, not just insulate in the gaps within the frame.
- Airtightness
- Uncontrolled air movement between inside and outside is a major cause of energy waste and discomfort, and reduces the effectiveness of insulation.
- Low thermal mass
- Despite conventional wisdom, high thermal mass (e.g. concrete) construction is often uncomfortable. This is obvious in mostly-cold climates like Canberra. Another reason to avoid high thermal mass construction is the carbon emissions associated with its production.
- Solar control
- Direct sunlight is I think essential for wellbeing in winter. But we need to control direct sunlight in summer. Roof eaves should be generous enough to provide good shade from above. East and west windows need seasonal external shading.
Of course, I did not come up with any of this myself. All these principles (except for low thermal mass) are standard in good building systems such as PassivHaus, and increasingly mainstream in Europe and the US. Shockingly, they are still unusual in Australia.
Design #
I spent about 8 weeks on research and design, going through several iterations.
The combination of these design considerations was tricky:
- height < 3m above ground level (see above)
- a gable roof (my daughter’s wish for a cottage vibe)
- sufficient slope on the roof for roof tiles (cottage vibe again)
- vapour control (see below)
Having a gable roof with the required 18° slope brings one end of the roof down so far that only a low door can fit in there.
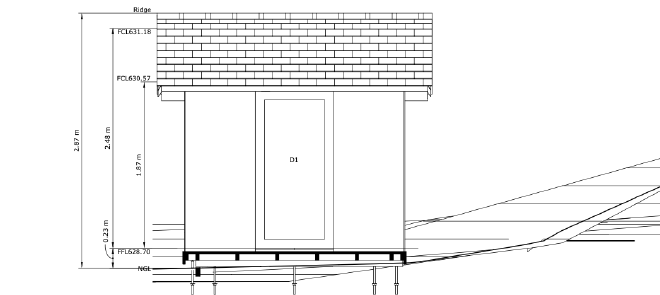
Aside: I could instead have had the door on a gable end wall. But I wanted the feeling of the ceiling raking up inside the entry. Like in Michael Pollan’s A Place of My Own.
This meant that
- the door had to be manufactured as a window instead of a normal door;
- the floor could not be raised far off the ground;
- the roof had to be as thin as possible.
Vapour control #
If water vapour enters the ceiling or walls, it can condense and cause mould, which is a health hazard and can damage the structure. This problem is managed with some combination of
- reducing humidity inside the house (ventilation)
- allowing vapour to escape to outside (vapour-permeable materials and membranes; ventilated cavities)
- preventing humidity from getting into the structure (air barrier)
- keeping the interstitial surfaces warmer than the condensation temperature (generally using exterior air-impermeable rigid foam insulation)
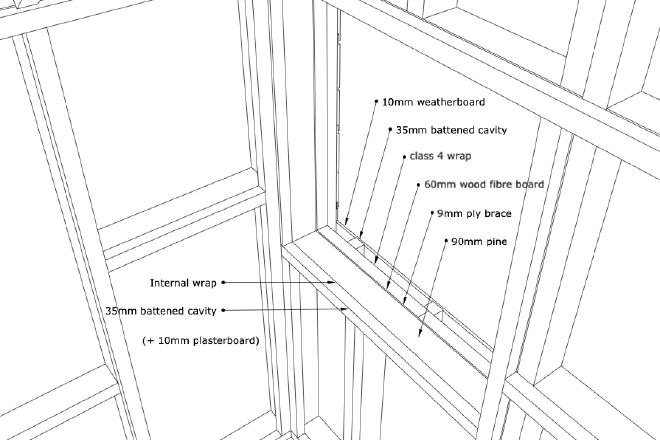
Fine. For my walls, I did the best-practice thing: vapour-permeable materials, covered with a vapour-permeable wrap, which was facing a ventilated cavity behind the weatherboard cladding. So any humid air that gets into the wall can permeate out through the wrap without causing a problem.
The roof is another story. Typically, roof tiles are laid on a framework of vertical battens then horizontal cross-battens, forming a cavity for ventilation and drainage. But in my case to reduce the height and also make tiling much easier, I chose a system with no cavity. ReadySlate tiles come with a waterproof backing and are nailed directly into plywood board. Alarm bells should be ringing at this point because this creates a vapour barrier. Condensation and mould are likely to form in the roof structure.
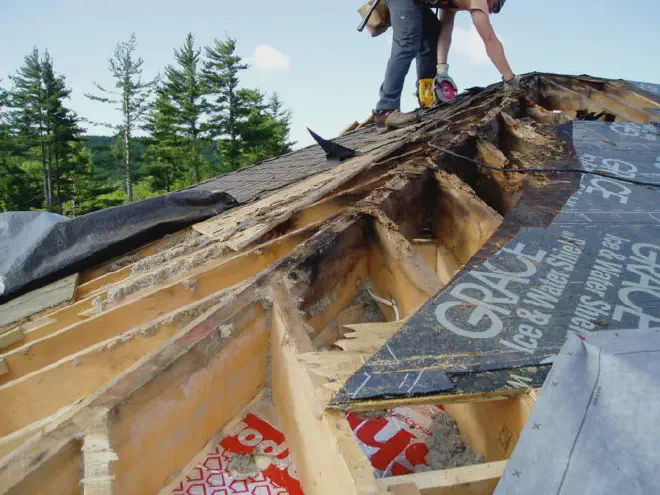
The solution was to use an Intelligent Air Barrier on the inside of the structure, to stop humid air from entering in the first place. “Intelligent” in the sense that the material opens up to allow humid air through only under high vapour pressure: so in summer when the roof gets hot, any residual moisture in the roof can dry towards the interior where it can be safely ventilated. This system has been promoted by US company 475 High Performance Building Supply and backed up by hygrothermal modelling.
The system is however controversial… several experts consider it risky. To mitigate the risk I designed in a Vapour Diffusion Port and also built in sensors for monitoring the moisture content of the roof structure over time.
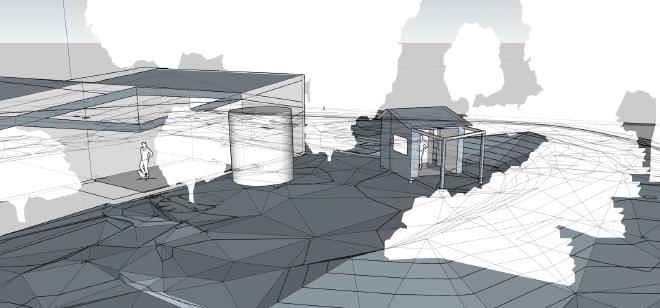
3D model #
Computers were supposed to be bicycles for our minds. That is too often laughably untrue, but I think it is true of modelling buildings in 3D. I was able to flesh out my ideas and reveal issues I would never have thought of ahead of time. My tool of choice was SketchUp. I used tags and components to organise things.
The 3D model was also incredibly useful in planning and costing the quantities of materials. I used the excellent SketchUp extension OpenCutList to calculate required timber and sheet materials.